How to Test Your Home for Radon: What the Result Means and What to Do Next

Test every home for radon with a qualified short-term or long-term test placed in the lowest lived-in level under closed-house conditions, and follow up or mitigate if the result is 4 pCi/L or higher.
Radon is one of the few serious home hazards you can’t find by looking, smelling, or listening. It’s a naturally occurring radioactive gas that can enter a house from the ground, and EPA says any home can have a radon problem: new or old, tight or drafty, with or without a basement. Testing is the only way to know the level in your home, which makes radon a good first-time-homeowner task: the first step is simple, low-cost, and noninvasive. You don’t need to diagnose the foundation or design a mitigation system. You need to run a valid test and know what the result means.
The short answer
EPA recommends testing all homes for radon. Do not use the EPA Radon Zone map to decide whether your individual home needs testing. EPA specifically says the map is for broad planning and shouldn’t be used to determine whether a particular house should be tested.
For a short-term DIY test:
- use a qualified radon test device;
- follow the device and laboratory instructions;
- place the test in the appropriate lowest lived-in level;
- maintain the required closed-house conditions;
- do not disturb the device;
- return or read the device according to its instructions.
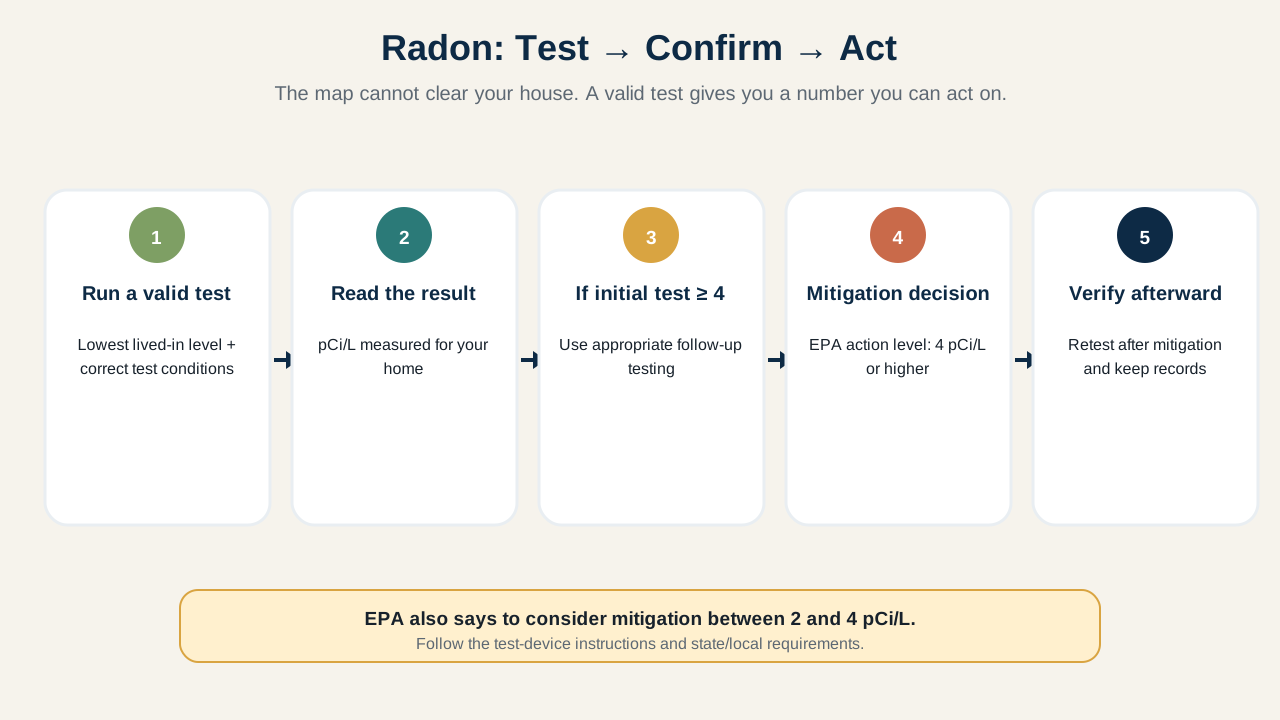
EPA recommends taking action to reduce radon when the confirmed level is 4 pCi/L or higher and says homeowners should consider fixing levels between 2 and 4 pCi/L. If an initial short-term test is 4 pCi/L or higher, EPA’s homeowner testing guidance calls for a follow-up test to confirm the decision.
Why the Map Doesn’t Answer the Question
EPA divides the country into radon zones based on the potential for elevated indoor radon. It’s useful for building codes, public-health planning, and targeting resources, but not a house-by-house prediction. EPA’s current map guidance says no matter where you live, test your home, and high radon levels have been found in every state. A house next door can test differently from yours because radon entry depends on site conditions, foundation pathways, pressure differences, construction details, and other factors that a regional map can’t resolve. The decision is straightforward: don’t infer. Test.
What Radon Is
Radon comes from the natural decay of uranium in soil and rock. The gas can move through the ground and enter buildings through cracks and other openings in the foundation, and EPA says soil gas is the main source of radon problems in homes. You can’t see or smell it. Radon exposure increases lung-cancer risk, and EPA identifies radon as the second leading cause of lung cancer in the United States after smoking, which is why this hazard is handled differently from something like visible mold or a leaking pipe. There’s no useful visual inspection that can clear a house of radon concern.
Start With the Right Test
Homeowners can use DIY radon test kits or hire a qualified measurement professional. EPA lists several sources for test kits, including state radon programs, home-improvement stores, and the National Radon Program Services at Kansas State University, and some state or local programs offer free or discounted kits. If you hire someone, EPA recommends using a qualified radon professional and checking state requirements. If you test yourself, use a qualified device and follow the laboratory or manufacturer’s instructions exactly. Testing errors can invalidate the result.
Short-Term vs. Long-Term Testing
Radon levels vary over time, which is why the length of the test affects what you learn. A short-term test gives you an initial result relatively quickly, and EPA homeowner guidance uses short-term testing as the first step in determining whether a radon problem may exist. Long-term tests run for more than 90 days and are more representative of the home’s year-round average radon level. For a homeowner who has never tested the house, a properly performed short-term test is a practical starting point; if the result is elevated, the follow-up strategy depends on the level and how quickly you need a decision.
Where Should the Test Go?
EPA guidance places a radon test in the lowest lived-in level of the home: the lowest level that is used regularly or could reasonably be occupied as living space. If a basement is used as a bedroom, family room, office, or other regularly occupied space, that may be the appropriate level; if the basement is unfinished and not used, the first floor may be the relevant lived-in level. Follow the test device instructions for exact placement. EPA guidance for short-term testing has long advised placing the device in a regularly used room, away from locations such as kitchens and bathrooms where humidity and ventilation can interfere. Don’t put the test where it will be bumped, moved, exposed to a draft, or manipulated.
Closed-House Conditions Matter
A short-term radon test isn’t simply “leave a sensor somewhere for two days.” Building conditions matter. EPA’s current Home Buyer’s and Seller’s Guide says that for short-term tests lasting 2 to 4 days, closed-house conditions should be maintained for at least 12 hours before the test begins and throughout the test period. For tests lasting 4 to 7 days, EPA recommends maintaining closed-house conditions during the test.
Closed-house conditions generally mean:
- windows closed;
- exterior doors closed except for normal entry and exit;
- no fans or machines bringing outdoor air into the house.
Normal heating and cooling operation can continue according to EPA testing guidance, and small exhaust fans may be used briefly as allowed by the test protocol. Follow the instructions that come with the specific device. If they conflict with what you remember from an article, the device protocol wins.
Do Not Manipulate the Test
A radon test only helps if it measures normal conditions honestly. Don’t move the device because the first location feels inconvenient, don’t open windows to improve the number, and don’t put the test next to a fan, vent, fireplace, or open window unless the device instructions specifically allow that placement. In a real-estate transaction, test interference can have legal consequences in some jurisdictions. For a homeowner testing their own house, the practical problem is simpler: a manipulated result just gives you bad information about your own risk.
What Does 4 pCi/L Mean?
Radon is commonly reported in picocuries per liter of air, abbreviated pCi/L. EPA recommends fixing a home when the radon level is 4 pCi/L or higher, and also says radon below 4 pCi/L still carries risk, recommending that homeowners consider mitigation between 2 and 4 pCi/L. There’s no level of radon exposure that EPA describes as completely risk-free. The 4 pCi/L level is an action threshold, not a line between “dangerous” and “safe.” That distinction helps prevent two common mistakes: ignoring a result because it’s 3.9, or panicking because a first short-term result is slightly above 4. The right response is to follow the testing and mitigation process.
What if the First Short-Term Test Is 4 pCi/L or Higher?
EPA homeowner guidance recommends a follow-up test, which can be a long-term test that gives a better picture of the year-round average, or another short-term test when you need a quicker decision. The higher the first result, the more reason there is to move quickly with confirmation. If you’re in a real-estate transaction, use the transaction-specific testing protocol and qualified tester requirements rather than improvising a general homeowner sequence.
What if the Result Is Below 4?
A result below 4 pCi/L doesn’t mean you should forget radon permanently. EPA says you may want to test again in the future, especially if living patterns change and you begin using a lower level, the home is renovated or altered, a previous test is no longer recent, or you’re buying or selling the property. EPA’s buyer/seller guidance uses “within two years” as an example of what may count as recent in a transaction. That’s not a universal law requiring every homeowner to test every two years, but it is a useful reminder that a radon result belongs to a particular house condition, test location, and period in time.
When Renovation Changes the Testing Question
A renovation can change how the house interacts with the soil and how lower levels are used. Finishing a basement is an obvious example: if a lower level becomes a bedroom, office, family room, or other regularly occupied space, EPA recommends retesting that level. Other changes to the building may also justify a new test. You don’t need to predict whether the renovation increased or decreased radon. Test the changed house.
If the House Has a Radon-Reduction System
A mitigation system doesn’t eliminate the need for testing. EPA recommends making sure the system is operating during testing. If you bought a house with a radon system already installed, document where the system is, whether the fan is operating, any system monitor or indicator, the most recent radon result, and the contractor or service information if available. Don’t assume that the presence of a pipe or fan proves the current radon level is low. Test.
Who Should Fix a Radon Problem?
Radon mitigation isn’t a general DIY repair topic. EPA directs homeowners to qualified radon-reduction professionals and provides links to state programs and national proficiency programs. A typical mitigation system may involve the foundation, soil-gas collection, vent piping, fans, sealing, electrical work, and discharge location, and the correct design depends on the building. The homeowner’s role should be to verify the problem, hire qualified help, and verify the result after mitigation. This is squarely a hire, don’t DIY situation. Don’t design a mitigation system from an internet diagram.
Test Again After Mitigation
Reducing radon isn’t complete when the equipment is installed. The result has to be verified. EPA guidance calls for post-mitigation testing to confirm that radon has been reduced. Keep the before-and-after results with the home’s maintenance records, and if the system includes a fan or performance indicator, include those checks in the ongoing home-maintenance routine. A mitigation system is an active home system, not a one-time certificate.
A Radon Decision Table
| What you find | What it means | What to do next |
|---|---|---|
| Home has never been tested | Radon level is unknown | Run a valid test |
| Map shows a “low” radon zone | Regional potential is lower, not a house-specific result | Test the home anyway |
| Initial short-term result is below 2 pCi/L | Lower measured level, but not zero risk | Keep the result and consider future retesting when conditions change |
| Initial result is 2 to under 4 pCi/L | Below EPA action level but still carries risk | Consider mitigation and future retesting |
| Initial short-term result is 4 pCi/L or higher | EPA action threshold reached | Perform appropriate follow-up testing and plan mitigation if confirmed |
| Result is very high | Faster confirmation is appropriate | Contact qualified radon professionals promptly |
| Basement becomes living space | Exposure pattern has changed | Retest on the lower lived-in level |
| House already has mitigation | System presence does not prove current level | Confirm system operation and test |
| Test conditions were not followed | Result may not be reliable | Repeat the test correctly |
Make Radon Part of the Home Baseline
Radon belongs on the same first-time-homeowner checklist as smoke and CO alarms, the main water shutoff, and the HVAC filter. During the first months in a home:
- Find out whether a valid radon test already exists.
- Check when and where it was performed.
- Determine whether the home’s use or structure has changed since then.
- Test if the level is unknown or the previous result is no longer useful.
- Save the result with the home records.
- If the result is elevated, follow the confirmation and mitigation process.
- Retest after mitigation.
This is one of the rare home-safety tasks where the homeowner can get high-value information without opening, climbing, dismantling, or diagnosing anything, much like the first-time homeowner maintenance checklist it belongs in.
Test the House You Actually Live In
Radon is easy to ignore because it produces no immediate symptom in the building: no stain appears, no alarm chirps, no pipe drips. That’s exactly why the right habit is measurement, not guessing from the age of the home, the neighborhood, the foundation type, or the EPA zone map.
Test correctly → interpret the result → confirm when needed → mitigate with qualified help → verify afterward
The first test doesn’t solve every radon question. It does something more important: it replaces an invisible unknown with a number you can act on.
This testing routine is one part of a larger indoor air and safety approach to home maintenance: know what’s actually in your home’s air, not just what you can see or smell. A radon test tells you about a gas you can’t sense at all; a simple humidity gauge does something similar for moisture. See what your indoor humidity should be for the same measure-first approach applied to dampness and mold risk.
Sources and further reading
We prioritize primary and authoritative sources. The sources below support the factual and technical guidance used in this article.
- U.S. Environmental Protection Agency: Radon
- U.S. Environmental Protection Agency: Home Buyer's and Seller's Guide to Radon (March 2024 revision)
- U.S. Environmental Protection Agency: EPA Map of Radon Zones and Supplemental Information
- U.S. Environmental Protection Agency: How do I get a radon test kit? Are they free?
- U.S. Environmental Protection Agency: Find a Radon Test Kit or Measurement and Mitigation Professional
Practical Homeownership provides general educational guidance. Home conditions, local rules, manufacturer requirements, and the appropriate professional scope can vary.