How to Check Your Water Heater Before It Leaks: A Safe Visual Inspection Guide

Visually check your water heater on a regular basis for leaks, staining, corrosion, and loose or aged connections; know where the shutoff is before you need it; and let a qualified professional handle any gas, internal electrical, relief-valve, or flushing procedure rather than following a generic online guide.
A water heater can run normally for years and then fail without much warning. That’s exactly why it’s worth checking on a regular basis instead of waiting for a puddle, cold water, or a stain on the ceiling below to tell you something’s wrong.
EPA WaterSense recommends regular maintenance of home hot-water systems, and it specifically tells homeowners to visually inspect water heaters for leaks, aged gaskets, loose connections or screws, and corrosion. It also recommends professional service at least once a year for anyone who wants every aspect of the system checked.
For a homeowner, the useful routine isn’t opening the tank or experimenting with controls. It’s simpler than that: look, document what you see, identify anything that’s changed, know where the shutoff is, and schedule qualified service once the situation moves past routine observation.
The short answer
On a routine visual check, look for:
- active drips or puddles;
- water staining below the tank or fittings;
- corrosion on the tank, valves, or visible connections;
- aged or deteriorated gaskets you can see without disassembly;
- loose-looking visible connections or screws;
- moisture at the base of the unit;
- a discharge pipe that appears damaged or altered;
- unusual rust, scorching, soot, or other visible deterioration;
- signs that water has been reaching nearby walls, flooring, or framing.
WaterSense recommends this kind of visual inspection on a regular basis, and it also recommends that homeowners consider professional water-heater service at least annually, especially when they want the system’s safety and maintenance items checked comprehensively.
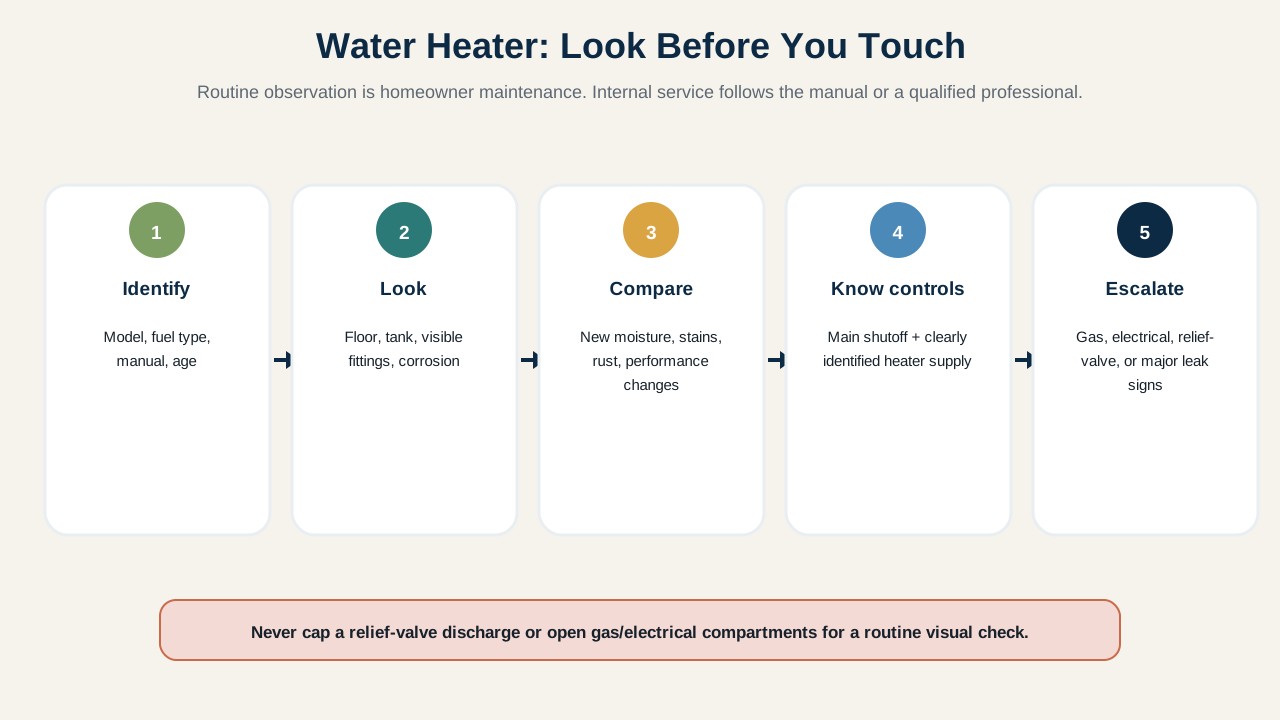
Don’t remove covers, open combustion compartments, alter gas connections, touch internal electrical components, or operate a temperature-and-pressure relief valve based only on a generic internet procedure. Use the exact water-heater manual or a qualified professional for those tasks.
Start by Identifying the Water Heater You Actually Have
Before deciding what “normal” looks like, identify the equipment. Record the manufacturer, model number, and serial number; the fuel or energy type; the approximate age if you know it; whether it’s a tank or tankless configuration; where it’s located; a link to the manual or digital manual; and any previous service history.
Common residential systems include electric storage-tank water heaters, gas storage-tank water heaters, heat-pump water heaters, tankless systems, and other fuel-fired systems. They don’t all follow the same maintenance procedure. A visual inspection can look fairly similar across several types, but internal maintenance, venting, combustion, electrical controls, filters, condensate systems, and descaling requirements vary quite a bit from one to the next. The manufacturer manual should control any equipment-specific maintenance, not a general checklist like this one.
Look at the Floor First
A puddle is usually easier to notice than a small drip on the tank itself, so start there. Check the area around and below the water heater for standing water, a damp floor, mineral residue, staining, swollen baseboards, damaged flooring, rust trails, or repeated wet spots.
If the heater sits in a drain pan, check the pan too. A dry pan is useful evidence, but it doesn’t prove every fitting above it is dry. Trace any visible water upward before assuming the tank itself is leaking: condensation, a nearby pipe, another appliance, or a plumbing fitting can sometimes create water in the same general area.
Inspect the Tank and Visible Connections
WaterSense specifically recommends checking for leaks, aged gaskets, loose connections or screws, and corrosion. Keep this part noninvasive. Look at the visible hot- and cold-water connections, valves, unions, flexible connectors, the drain area, the tank exterior, seams, and nearby piping. You’re looking for evidence, not trying to tighten everything in sight.
A connection that looks wet, corroded, or mineral-stained deserves attention. Randomly tightening fittings can make things worse, particularly on old or corroded plumbing, so if you can’t identify a fitting or aren’t sure whether it’s safe to touch, document it and bring in a plumber or a qualified water-heater technician.
Rust and Corrosion Need Context
Not every discoloration means the tank is about to fail, but corrosion is one of the specific conditions WaterSense tells homeowners to watch for. Pay attention to where it shows up. Surface rust on a nearby bracket is a different story than corrosion at a water connection, rust tracking down the side of the tank, a corroded valve body, a wet rusty seam, or repeated staining at the base.
Take a photo so you can compare it during future checks. If the corrosion is spreading or shows up alongside moisture, move from observation to service. Don’t scrape, grind, sand, or open a corroded component just to see how bad it is underneath.
Know Where the Water Shutoff Is
A visual inspection is a lot more useful if you already know how the water supply to the heater or the house is controlled. Our guide to finding your main water shutoff valve covers the whole-house baseline, and depending on your plumbing layout, the water heater may also have its own accessible shutoff on the cold-water supply line.
Don’t wait for an active leak to go looking for the control. Record the whole-house main shutoff, the water-heater supply shutoff if you can clearly identify one, the utility emergency number if relevant, and your water-heater service contact. Don’t force a corroded, stuck, damaged, or unclear valve just to prove it moves. If you’re not sure which valve controls the heater, verify it through the manual, the plumbing layout, or a qualified professional before an emergency forces the question.
Don’t Confuse a Leak With Condensation
Some water-heater systems produce condensate as part of normal operation. Heat-pump models and high-efficiency fuel-fired equipment may include condensate drains or related components, which means water near the system isn’t automatically a sign of a leaking tank.
At the same time, assuming “it’s probably condensation” isn’t a good reason to ignore unexplained moisture. Use the same pattern-first framework we use elsewhere on the site for moisture issues: pattern, context, timing, source, escalation. Ask whether the moisture only appears while the unit is running, whether there’s a designed condensate drain, whether that drain is actually the source, whether water is showing up at a plumbing connection instead, whether the area stays dry at other times, and whether the stain is growing. If you can’t identify the source with confidence, have it evaluated. Our guide on checking your home for hidden water leaks walks through that broader process in more detail.
The Temperature-and-Pressure Relief Valve Is a Safety Device
Storage water heaters commonly rely on a temperature-and-pressure relief valve as an important safety component. WaterSense recommends checking the temperature-and-pressure valve at least annually and points homeowners to their water-heater manual for the actual maintenance instructions.
This is where this article stops giving generic operating steps. Relief-valve testing can release very hot water and can expose an unsafe condition if the valve, discharge piping, or tank is defective. Don’t copy a one-size-fits-all lever procedure from an article without first following the exact manufacturer instructions for your unit and understanding where the discharge actually goes. If the valve is leaking, corroded, altered, capped, plugged, or the discharge piping looks unsafe, bring in a qualified professional, and never block or cap a relief-valve discharge just because it’s dripping.
Annual Flushing Is Manufacturer-Controlled Maintenance
WaterSense’s current home-maintenance guidance recommends flushing a water heater once a year to reduce sediment buildup that can hurt efficiency, and it also tells homeowners who choose DIY maintenance to consult the water-heater manual. That qualification matters.
The safe method depends on the equipment, and it can involve electrical isolation, fuel or burner controls, hot water, hoses, drains, refill procedures, and restart requirements. This guide isn’t going to turn that into a universal DIY procedure. Use the manufacturer manual exactly, or have a professional perform the maintenance. A water heater that looks fine on the outside can still need scheduled internal maintenance you can’t see from a visual check.
Watch for Changes in Hot-Water Performance
Pair your visual inspection with a basic performance history. Document changes such as hot water running out sooner than it used to, water taking much longer to heat, inconsistent hot-water temperature, unusual sounds, repeated shutdowns, visible error codes, or noticeably higher energy use without another explanation.
None of those symptoms points to one specific failure by itself. Sediment, heating elements, burners, controls, capacity, plumbing, usage patterns, or other conditions may be involved. The useful conclusion isn’t “the tank is bad.” It’s “the system has changed and deserves a diagnosis.”
Gas or Combustion Signs Change the Safety Boundary
If your water heater burns gas or another fuel, combustion and venting add safety concerns that don’t exist in the same way on a simple electric tank. Don’t open combustion areas or alter vent connectors as part of a homeowner leak inspection.
Stop and get qualified help if you notice a gas odor, soot, scorching, damaged venting, unusual combustion odors, a vent connector that appears disconnected, or repeated safety shutdowns. If you smell gas, leave the area and follow the emergency instructions of your gas utility or local emergency services. Don’t operate switches or try to diagnose the source while you’re still in the affected area. Smoke and carbon monoxide alarms are a separate safety layer, not a substitute for correct combustion and venting; our guide to smoke and carbon monoxide alarms covers that layer on its own.
Electrical Water Heaters Have Their Own Boundary
An electric water heater can look mechanically simple from the outside, but internal heating elements and controls still involve line-voltage electricity. Don’t remove access panels or probe internal wiring as part of a routine homeowner inspection.
If there’s scorching, melted insulation, buzzing, damaged wiring, tripping breakers, or evidence of water near electrical components, stop and use qualified service. Water and electricity change the decision quickly, and this isn’t a place to improvise.
A Water-Heater Inspection Table
| What you find | What it suggests | What to do next |
|---|---|---|
| Tank and floor are dry | No visible leak found | Continue routine monitoring |
| Dampness at a visible plumbing connection | Local connection may be leaking | Document and have connection corrected if needed |
| Water at base of tank with no clear external source | Tank or lower component leak is possible | Arrange qualified evaluation promptly |
| Corrosion at a wet fitting | Deterioration is active | Don’t just tighten blindly; get it serviced |
| Dry rust on unrelated bracket | May be surface corrosion only | Photograph and monitor |
| Relief valve or discharge area is leaking | Safety device/system condition needs evaluation | Follow manual/qualified service; never cap discharge |
| Gas odor or soot | Combustion hazard is possible | Leave/stop and follow gas-emergency procedure |
| Water near electrical components | Electrical hazard is possible | Stay clear and use qualified help |
| Performance changed but no visible leak | Internal/system problem may exist | Schedule diagnosis rather than guessing |
| Manual/service history is unknown | Maintenance baseline is incomplete | Find model manual and establish service record |
When a Leak Needs Faster Action
Don’t wait for a routine service appointment if water is actively spreading, a tank appears to be releasing water continuously, nearby electrical equipment is wet, water is damaging ceilings or flooring, a valve or fitting is visibly failing, or the unit shows both leakage and signs of electrical or combustion trouble.
Control the water only if you can reach the correct shutoff safely. Don’t enter standing water around electrical equipment, and don’t manipulate gas controls during a suspected gas leak. If you can’t stop the water safely, move away from the hazard and call the appropriate professional or utility.
Leak Detection Can Add Another Layer
EPA WaterSense recognizes moisture sensors and flow-monitoring systems as useful tools for catching leaks or unexpected water use early. A water heater is one of the areas where a floor-level moisture sensor can give you a warning before a small leak becomes a large one.
A sensor doesn’t maintain the water heater, doesn’t replace the shutoff, and doesn’t tell you why water is present. It just gives you earlier evidence. That can be genuinely valuable when the heater sits in a basement, closet, utility room, garage, or anywhere else you don’t look at every day.
Build a Water-Heater Baseline
For a new homeowner, it’s worth recording the manufacturer, model, serial number, approximate age, fuel type, manual location, water shutoff location, previous service date, current visible condition, existing corrosion or staining, drain-pan condition, leak-sensor presence, and professional service contact, then taking photos.
Repeat a quick visual inspection periodically after that. The point isn’t to predict the exact day the unit will fail. It’s to notice a change before the first sign you actually recognize is water damage.
Look Before You Touch
Water-heater maintenance ranges from simple observation all the way up to work involving hot water, electricity, fuel, pressure, and combustion. Keep the homeowner boundary clear:
Routine visual inspection: yes, that’s your job. Equipment-specific internal maintenance: the manual or a qualified service call. Gas, internal electrical, unsafe relief-valve, or major leak conditions: professional or emergency response.
Use EPA WaterSense’s maintenance guidance as the baseline, then let the actual manufacturer instructions control the equipment itself. A five-minute visual check can’t prove the water heater is perfect, but it can tell you whether the system still looks like the one you documented last time, and whether enough has changed that you should act before a leak becomes the first warning you get.
For the rest of the routine maintenance that keeps a home running, the first-time homeowner maintenance checklist is a good place to see where a water-heater check fits into the bigger picture, and our DIY or hire a professional guide can help you decide when any of the escalation points above call for a call instead of a closer look.
Sources and further reading
We prioritize primary and authoritative sources. The sources below support the factual and technical guidance used in this article.
Practical Homeownership provides general educational guidance. Home conditions, local rules, manufacturer requirements, and the appropriate professional scope can vary.