How to Check Your Home for Hidden Water Leaks: Start With the Water Meter

Check your home for hidden water leaks by reading the water meter before and after a two-hour period with no water use, then inspect toilets, faucets, and appliance connections before calling a professional.
A leak doesn’t have to leave a puddle to cost you water, money, or eventually damage to the house.
Some leaks are obvious: a dripping faucet, water pooling under a sink, a toilet that keeps running. Others stay quiet: a supply line leaking inside a wall, a toilet losing water into the bowl without much noise, or an irrigation system running when you think everything is off. For a homeowner, the useful question isn’t whether you can diagnose every hidden leak yourself. It’s whether you can tell that water is moving when the house should be using none, and that’s exactly what the water meter is good for.
EPA WaterSense recommends checking the meter before and after a two-hour period when no water is being used. If the reading changes, you probably have a leak somewhere in the home. The meter won’t tell you where the leak is, but it gives you a starting point.
The short answer
If you suspect a hidden leak:
- Make sure no water-using appliance, fixture, irrigation cycle, or automatic system is running.
- Record the water-meter reading.
- Do not use water for about two hours.
- Read the meter again.
- If the reading changed, investigate the most likely accessible sources first.
Start with toilets, faucets, exposed plumbing connections, appliance supply hoses, exterior hose bibbs, and other places you can inspect without opening walls or dismantling systems. If the meter continues to show unexplained use after the obvious sources are ruled out, the problem has moved from a basic homeowner check into leak location and diagnosis. That’s the point to bring in a plumber or leak-detection professional rather than cutting into walls based on a guess.
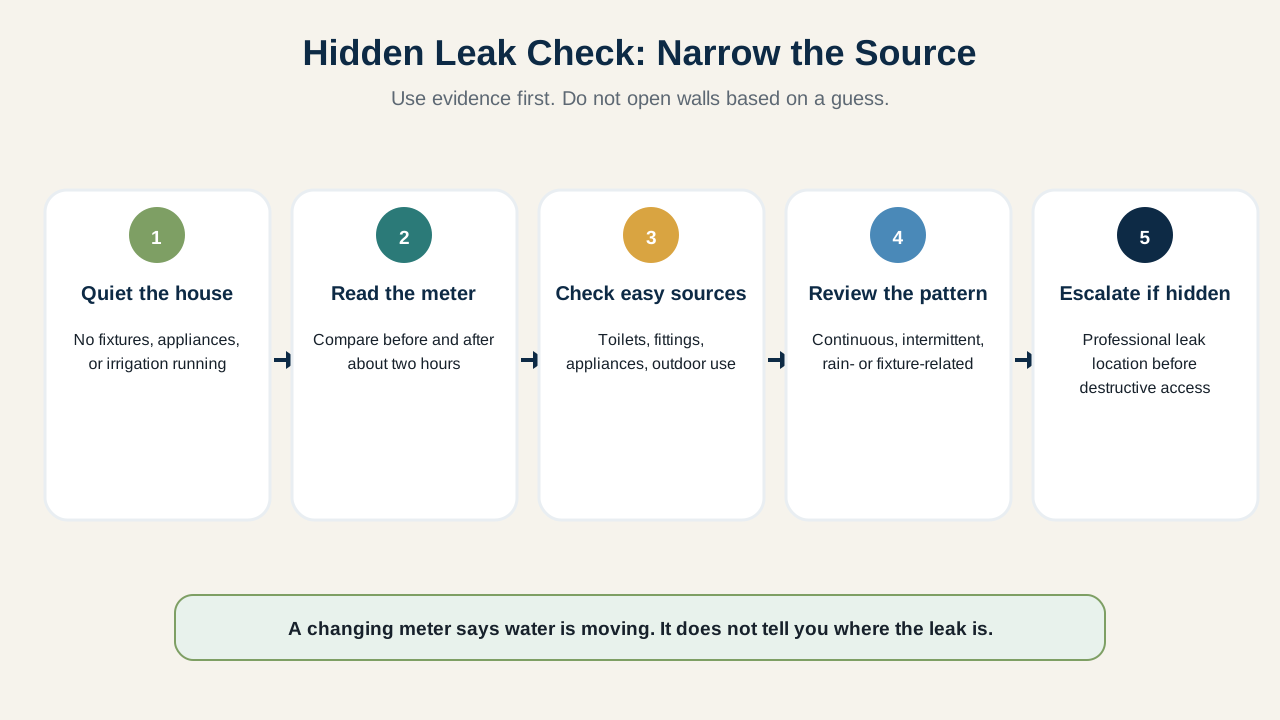
What the Water Meter Can Tell You
A water meter records water passing through the service to the property, which makes it useful for a simple test: if everything in the home is supposed to be off but the meter keeps changing, water is still moving. EPA WaterSense uses this exact principle in its homeowner guidance.
Keep the conclusion narrow, though. A changing meter supports the idea that water is being used or lost somewhere on the metered side of the system, but it doesn’t identify the source by itself. The cause could be as simple as a toilet flapper that won’t seal, or as difficult to locate as an underground service-line leak. The meter is a screening tool, not a leak locator.
Before You Test, Eliminate Normal Water Use
A meter test only means something if the house is actually quiet from a water-use standpoint. Before recording the first reading, check for anything that may run automatically:
- dishwasher;
- washing machine;
- refrigerator ice maker;
- water softener regeneration;
- irrigation system;
- pool or spa equipment;
- humidification equipment connected to the water supply;
- automatic pet-water or specialty equipment;
- someone using a sink, toilet, shower, or hose.
If any of those runs during the test, a changed meter reading doesn’t prove a leak. Choose a period when you can control water use and know what the house is doing.
How to Run the Two-Hour Meter Check
EPA WaterSense recommends reading the meter before and after a two-hour period when no water is being used. The exact display varies by meter: some have mechanical dials, some have digital displays, and some utilities provide customer portals with interval data. You don’t need to understand every part of the meter; you need a repeatable reading.
1. Find the meter
If you have municipal water, the meter may be near the curb, in a meter box, or inside the house, depending on the region and utility. Don’t assume that opening or operating equipment near the meter is allowed. Article #6 on the main water shutoff explains why customer and utility responsibilities vary. For this test, you’re reading the meter, not operating a utility-controlled valve.
2. Record the reading
Take a photo if that makes comparison easier. If the meter has a leak indicator or flow display, note its position as well, but use your utility’s documentation to understand what that indicator means.
3. Stop water use
Don’t run fixtures or appliances during the test period.
4. Read the meter again
If the reading changed, EPA says you probably have a leak. If it didn’t change, that’s useful evidence that there was no continuous metered water use during the test window, but it doesn’t rule out every intermittent leak. A toilet that leaks only occasionally, or an irrigation problem that occurs only during a scheduled cycle, may not show up during a quiet two-hour test.
Start With the Easy-to-Verify Sources
Once the meter suggests unexplained water use, check the places where a homeowner can gather evidence without creating new damage.
Toilets
Toilets are a common source of silent water loss. EPA WaterSense recommends placing a few drops of food coloring in the toilet tank; if color appears in the bowl after about 10 minutes without flushing, the toilet is leaking. Flush immediately after the test so the coloring doesn’t sit in the tank, and test one toilet at a time if you’re trying to narrow the source.
Faucets and exposed fittings
Look for visible drips and moisture around faucet bases, supply-line connections, shutoff valves, exposed pipe joints, and under-sink cabinets. EPA also recommends checking faucet gaskets and pipe fittings for water on the outside of the pipe. A dry cabinet doesn’t prove the plumbing behind the wall is dry, but visible moisture gives you a source you can act on.
Appliances
Inspect accessible supply and drain connections around washing machines, dishwashers, refrigerators or ice makers, water heaters, and water softeners. You’re looking for water, corrosion, staining, swelling, or a connection that’s actively dripping. A visual water heater inspection covers that one appliance in more depth: it’s often the easiest place to find a slow leak, since a water heater rarely gets a second look once it’s installed. Don’t pull out a heavy appliance or disconnect a line merely to complete the inspection if doing so creates more risk than the check is worth.
Exterior fixtures and irrigation
Check hose bibbs, visible irrigation components, and outdoor fixtures. If your utility provides interval-use data, an overnight or recurring pattern may also help separate indoor and outdoor use.
Use the Main Shutoff to Narrow the Problem (Only When It’s Safe)
If you’ve already located and verified your homeowner-controlled main shutoff, it can sometimes help separate a leak inside the house from a leak on the service line or another part of the property. But this isn’t a universal test to perform casually: utility layouts vary, and the position of the meter relative to the homeowner shutoff matters. A stuck, corroded, leaking, or unclear valve shouldn’t be forced just to troubleshoot a meter reading. If you haven’t already confirmed which shutoff belongs to you and that it operates normally, return to the main-water-shutoff baseline first. Don’t turn leak detection into emergency valve repair.
What if the Meter Doesn’t Move?
A stable meter during a two-hour no-use period is reassuring, but it isn’t the same as proving the house has no leaks. Some problems are intermittent: toilet leaks that occur after certain flushes, irrigation leaks only when a zone runs, appliance leaks only during a cycle, roof or exterior-water intrusion that has nothing to do with the plumbing meter, and condensation that appears only under certain temperature and humidity conditions.
That last one matters, because not every wet spot is a plumbing leak. Article #2, “Condensation or Leak?”, uses timing, location, weather, humidity, and recurrence to keep several explanations open until the pattern becomes clearer. The water meter only helps with one branch of that decision: metered water use. It can’t detect rainwater, groundwater seepage, roof leaks, or condensation.
What if Your Water Bill Suddenly Jumps?
A higher bill can be a clue. EPA WaterSense recommends comparing monthly water use with the same month of the previous year. A significant unexplained increase may point to a leak. But bills need context: seasonal irrigation, guests, travel patterns, a new appliance, a pool, or changes in household use can all change consumption legitimately. Treat the bill as a prompt to investigate, not a leak diagnosis.
A useful sequence is:
Bill change → meter check → fixture checks → pattern review
Each step gives you better evidence.
Leak-Detection and Flow-Monitoring Devices
EPA WaterSense also recognizes leak-detection and flow-monitoring devices as useful tools for identifying unusual water use or unexpected moisture. Different products work differently: some use moisture sensors placed near vulnerable areas, others measure water flow and look for patterns that may indicate a leak, and some systems can integrate with automatic shutoff capability.
They can be helpful, especially if you travel often or have areas where a small leak could cause major damage, but they’re not a substitute for understanding the home’s basic shutoffs, accessible plumbing, and normal water-use pattern. A smart sensor is most useful when you know what you want it to protect and what you’ll do when it sends an alert.
When the Pattern Points to a Hidden Leak
You may reach a point where the evidence says water is moving, but the source isn’t visible: the meter changes during a controlled no-use period, toilets pass the dye test, exposed fixtures and appliance connections are dry, irrigation or outdoor use is ruled out, and water use remains unexplained.
At that point, opening walls randomly isn’t a good diagnostic strategy. A plumber or leak-detection professional may use tools and methods that let them narrow the source with less destructive access. The cost of a wrong guess isn’t only the plumbing repair. It’s the drywall, flooring, cabinetry, or other finishes you may remove without finding the leak. If you can’t verify the source without destructive work, professional diagnosis becomes much more valuable, which is exactly the kind of call the DIY or hire a professional framework is built to help with.
Signs That Need Faster Attention
Some water problems shouldn’t wait for a careful two-hour experiment. Move faster if you see:
- active water spreading across a floor;
- a ceiling that is bulging or visibly saturated;
- water near electrical equipment or wiring;
- a rapidly increasing stain;
- loss of water pressure combined with signs of leakage;
- structural materials becoming saturated;
- sewage or contaminated water.
If water is near electrical equipment, don’t walk into standing water or reach through a wet area to operate a valve or appliance. Control the water only if you can do it safely. Property damage is secondary to electrical safety.
Build a Water-Use Baseline Before You Need One
A first-time homeowner can make future leak detection much easier by documenting the water system while everything is normal. That’s the same kind of groundwork the first-time homeowner maintenance checklist already covers. Record:
- water-meter location;
- homeowner main-shutoff location;
- utility emergency contact;
- normal monthly water-use range;
- locations of important fixture shutoffs;
- appliance supply connections;
- irrigation schedule;
- any installed leak sensors or flow monitor.
Take a meter photo when the house is operating normally, and learn how your utility displays usage. If your provider offers leak alerts, EPA WaterSense recommends signing up for them. The more normal behavior you know, the easier it is to recognize abnormal behavior.
A Practical Leak-Check Table
| What you find | What it suggests | What to do next |
|---|---|---|
| Meter changes during a two-hour no-use period | Water is moving when it should not be | Check toilets, fixtures, appliances, and outdoor systems |
| Toilet dye reaches the bowl | Toilet is leaking | Repair the toilet or have it serviced |
| Visible moisture at a supply connection | Source may be local and identifiable | Stop use if needed and address the connection |
| Meter stays stable | No continuous metered use detected during that window | Look for intermittent use or non-plumbing moisture sources |
| Bill rises but meter test is stable | Use may be intermittent or legitimate | Review irrigation, appliances, occupancy, and interval data |
| Meter changes but accessible checks find nothing | Hidden or underground leak becomes more plausible | Consider professional leak detection |
| Wet area appears after rain | Plumbing may not be the source | Evaluate exterior intrusion and moisture pattern |
| Water is near electrical equipment | Immediate safety issue | Stay clear and get qualified help |
Reduce the Unknowns
A hidden leak feels difficult because the source is unknown. The solution isn’t to start opening things. Start with measurements you can trust.
Meter → toilets → visible connections → appliances/outdoor systems → pattern → professional diagnosis if needed
That sequence turns a vague suspicion into a smaller set of possibilities. The water meter can’t tell you exactly where the leak is, but it can tell you something just as useful at the beginning: whether the house is using water when it shouldn’t be.
This leak-check routine is one part of a larger moisture and water approach to home maintenance: catch problems with measurement before they turn into visible damage. A running meter with no fixtures in use points to a leak like the ones in this guide. That’s a different problem from groundwater and rainwater, which is what a sump pump is designed to handle, so see testing your sump pump before heavy rain if a wet basement is the concern instead of the water bill, or checking drainage around your foundation if the moisture only shows up after rain. A sudden pressure or flow change can also be a clue worth ruling out. See checking your home’s water pressure if the meter looks normal but something still feels off at the fixtures. And if the mystery water is showing up near a capped pipe rather than a fixture, finding your sewer cleanout can help you rule out the sewer lateral before you start opening walls. If you’ve already found the leak rather than hunting for a hidden one, what to do in the first 24-48 hours after a minor water leak covers stopping the source, protecting people and electricity, and drying materials before mold becomes the bigger problem.
Sources and further reading
We prioritize primary and authoritative sources. The sources below support the factual and technical guidance used in this article.
Practical Homeownership provides general educational guidance. Home conditions, local rules, manufacturer requirements, and the appropriate professional scope can vary.